THE….. CupRotator
Inhaltsverzeichnis
1. Preface Inhalt
 Well, it has been a long time since my last post, and I guess it’s time to be awesome again. This post will be about a contraption created following a challenge by a work colleague. You may know that at the moment I work for B/S/H/, a vendor for home appliances sold under several well-known brands, such as Siemens, Bosch, Gaggenau and Neff.
An upcoming feature is the connectivity of some of the appliances, where they’re connected to the Internet and the B/S/H/ cloud, and can in turn be remotely operated and monitored through the Home Connect phone app or third party devices, such as Amazon ALEXA or Google Home.
In short, one day the colleague approached me and said that he’s missing two important features in his coffee maker:
- When – as displayed in the advertisment – he wants to have a coffee in the morning and prepares the cup in the evening by placing it under the coffee outlet, the first thing upon turning on is the rinse step of the coffee maker. Ugly old coffee water in the cup 🙁
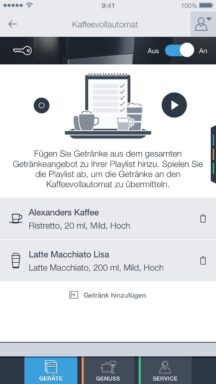
- In the Home connect App, we have a function called a coffe playlist, see picture here on the right. You can add up to 6 coffee related beverages to the playlist and have the coffee machine prepare each one after another. Alas, you still have to switch cups manually 🙁
Well, challenge accepted, it’s time to get engineery again 😀
2. Solution Inhalt
Ideally, we’d have a solution that:
- works completely independent of the coffee machine,
- can be retrofitted,
- and is remotely controllable with standard Internet protocols.
Also, the mechanical construction must be able to carry 6 cups up up to 250ml water, meaning round about 3kg of mass. The worst case though is if you just load 3 cups on one side, the balance is stressed at maximum in this case.
A nice addition would be looks and LEDs, of course – let’s see where this gets us 🙂
2.1 Mechanics Inhalt
The most important parts are the turning wheel itself and its base.
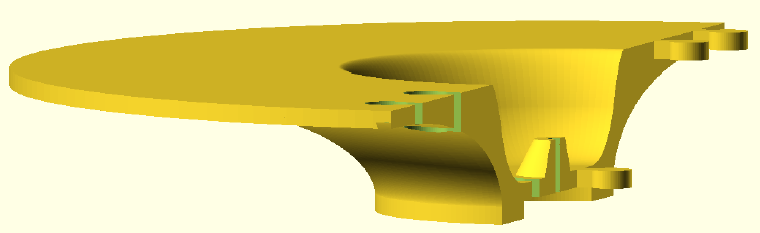
As you can see in this picture, the wheel is split into 2 equal parts mechanically linked by the noses and their counterparts. This creates a very strong bond. Also, the surface is flat – the half can be printed on a TEVO Black Widow easily. Of course, you’d need two of those.
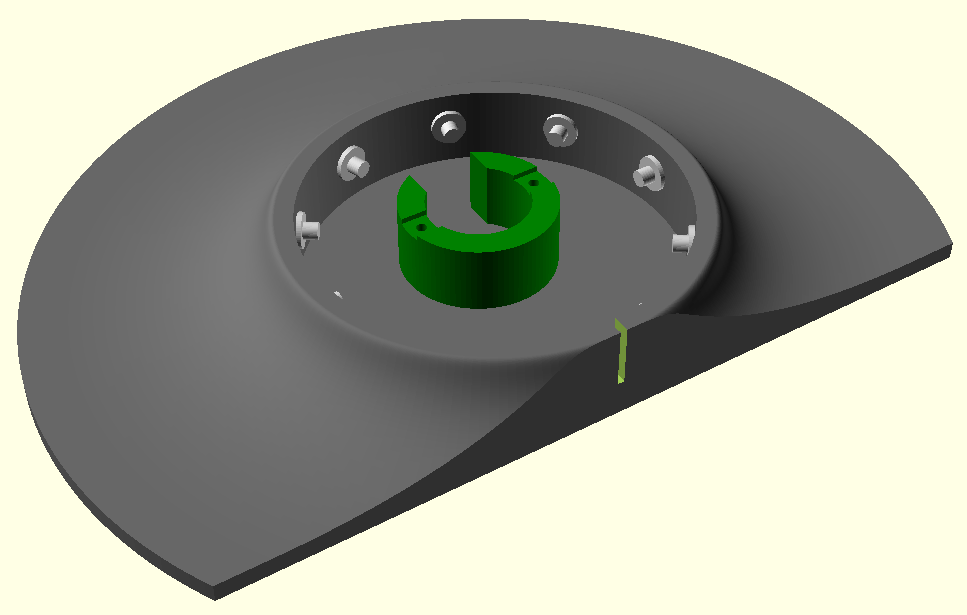
The base, as shown in this picture, has a flat side which is meant to be put towards the side of the coffee maker drip tray.
 The 10 white parts are knobs that receive miniature bearings. On those, the turning wheel above will run, they carry the majority of the weight load applied by the wheel and the cups. I used 8x16x5mm bearings for those.
The slit is used to guide out all the wires for the motor, position sensor and LEDs, after all, this is meant to be a pre-to-type, as we say at work.
Not visible in above image is the guiding channel in the base where you’d place the WS2812b strip with 14 LEDs. It allows for awesome „rotating“ and „done“ animations to be sent by the app upon completion of the beverage preperation.
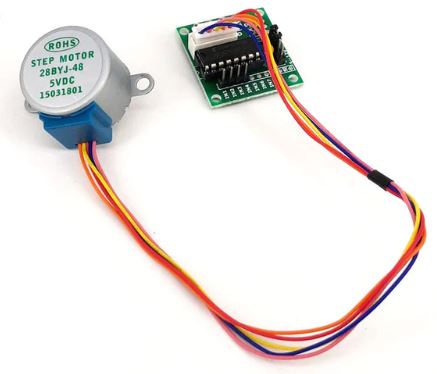
In the green area there the geared motor is placed, in this case a 7.5° very cheap AliExpress product (28BYJ-48 5V 4 Phase DC Gear Stepper Motor + ULN2003 Driver Board). The rotating wheel is screwed into the motor axis and secures the wheel agains lift off in any direction. At the same time, the gear is strong enough to drive even a fully loaded wheel.
The only difficult thing was to get the bottom part of the wheel, which runs on the bearing, completely flat. A flat sand paper with a wooden block helps a lot here.
The base part needs to be printed in white or transparent material in case you want to use the LEDs.
2.2 Electronics Inhalt
In this first demonstrator, we’re going to use our standard ESP8266 platform which provides connectivity and control functions for the turning wheel and the LEDs.
It drives the LEDs (standard WS2812b protocol via UART1-TX), recognizes each position (1-6) via an infrared reflective sensor by a piece of black tape at each position, and uses four outputs in order to command the ULN2003 motor driver. In the Arduino-Library, there is a ramp-up and ramp-down implemented, thus easing start and stop of the rotation.
Also, the ESP8266 integrates into a consumers WIFI easily and can be controlled via simple UDP messages. Just send „START“ to a certain port on the device and it rotates. You can listen to the same port on your cell phone, where you’ll receive „SUCCESS“ or „ERROR“, in case the rotation took too long to find the next position.
At the same time, a nice animation is displayed on the LEDs.
3. Demonstration Inhalt
Do note that this project is neither endorsed by nor affiliated with B/S/H/ Hausgeräte GmbH, it’s a completely private endeavour.
4. Findings and Caveats Inhalt
- It turned out that the motor in the center is not strong enough to drive all loads. Thus, a different mounting solution would need to be constructed in order to make it more robust.
- Using an IR reflective sensor works very well.
- The mechanism with 10 bearings is strong enough to carry all loads, no problems here.
- The leverage against the flat part of the base is too strong with 2 or 3 filled cups on one side, it tips over against the machine. So, here too a solution would need to be found for a next version.
Unfortunately, it was not possible to integrate this demonstrator into a development version of the Home Connect App, mostly due to limited ressources, so I couldn’t really test it in a live setup where the App would -instead of expecting the „next“ button press- tell the CupRotator to advance one position, make the coffee, advance again … and so on.
Still, I hope you like it!
Bislang keine Kommentare vorhanden.
Einen Kommentar hinterlassen